Are you having trouble connecting your Android device to your computer? Do you need to transfer files or debug your device? If so, enabling USB debugging on your Android device can help. In this blog post, we will show you how to enable USB debugging on Android with ease.
USB debugging is a feature that allows developers to communicate with Android devices via a USB connection. Enabling this feature allows you to transfer files between your Android device and your computer, as well as debug and test applications. However, it is disabled by default to prevent unauthorized access to your device. But don’t worry, enabling USB debugging is a straightforward process. With just a few clicks, you can unlock the full potential of your Android device and make your life easier. So, let’s dive in and learn how to enable USB debugging on Android.
As a tech enthusiast, you might have come across the term “USB Debugging” while exploring your Android device’s settings. But what exactly is USB Debugging, and why is it essential? In this article, we will explore everything you need to know about USB Debugging, including its definition, purpose, and benefits.
Table of Contents
1. What is USB Debugging?
USB Debugging is a mode that allows Android devices to communicate with a computer via USB cable, enabling developers to test and debug their applications. In simpler terms, it gives you access to the inner workings of your Android device and enables you to modify system settings, install custom ROMs, and use advanced applications.
2. How to Enable USB Debugging
Enabling USB Debugging is a straightforward process. However, the steps may vary slightly depending on the Android version and device model. Here’s a general guide:
1. Go to your device’s Settings menu.
2. Scroll down and tap on “System” or “Developer Options.”
3. If you can’t find Developer Options, go to “About Phone” and tap on “Build Number” seven times.
4. Once you’ve enabled Developer Options, go back to the previous menu, and tap on it.
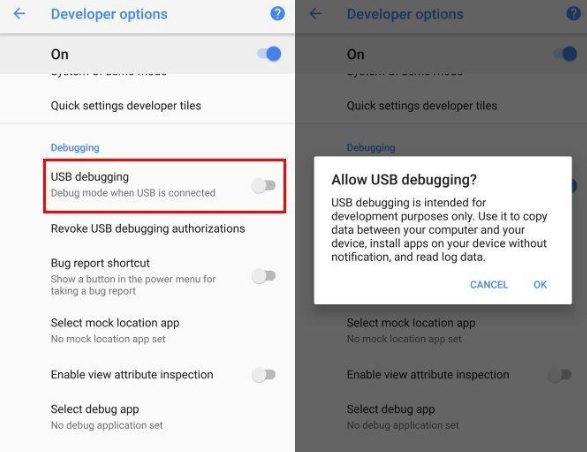
5. Scroll down and toggle on “USB Debugging.”
That’s it! Your device is now ready to communicate with your computer via USB cable.
3. Benefits of USB Debugging
USB Debugging has several advantages for both developers and regular users. Here are a few:
Advantages for Developers
1. Debugging: As the name suggests, USB Debugging helps developers identify and fix bugs in their applications quickly.
2. ADB commands: Developers can use ADB commands to control their devices, install applications, and access system files.
3. Performance testing: USB Debugging allows developers to test their applications’ performance on different devices.
Advantages for Regular Users
1. Rooting: If you want to root your Android device, you need to enable USB Debugging.
2. Custom ROMs: USB Debugging allows you to install custom ROMs and customize your device’s look and feel.
3. Data backup: With USB Debugging, you can back up your device’s data to your computer.
4. Troubleshooting USB Debugging
While USB Debugging is a handy feature, it can sometimes cause issues, such as connectivity problems or driver issues. Here are some common issues and their solutions:
1. “Device not recognized” error: Try installing the latest USB drivers for your device.
2. “Device offline” error: Make sure your device is connected to the computer via USB cable and that USB Debugging is enabled.
3. “ADB not responding” error: Restart the ADB server on your computer.
5. Final Thoughts on USB Debugging
USB Debugging is a powerful tool that can unlock the full potential of your Android device. Whether you’re a developer or a regular user, enabling USB Debugging can help you customize your device, test applications, and fix bugs. However, make sure you only enable it when necessary and disable it when you’re done to avoid any security risks. With these tips in mind, you can now unlock the power of your Android device with ease.
Frequently Asked Questions
Enabling USB debugging on your Android device is a straightforward process. Here are the steps you need to follow:
1. Go to your Android device’s “Settings” menu
2. Scroll down and select “Developer options”
3. Toggle on “Developer options” (if it’s not already on)
4. Scroll down to “USB debugging” and toggle it on
That’s it! Now your Android device is ready for USB debugging.
Why do I need to enable USB debugging on my Android phone or tablet?
There are several reasons why you might want to enable USB debugging on your Android device. Here are a few:
– **App development:** If you’re an app developer, you need to enable USB debugging to test your app on a real device.
– **Data transfer:** If you want to transfer files between your Android device and a computer, you need to enable USB debugging.
– **Rooting and flashing ROMs:** If you want to root your Android device or flash custom ROMs, you need to enable USB debugging.
Is it safe to enable USB debugging on my Android device, and what precautions should I take?
Enabling USB debugging on your Android device is generally safe. However, there are a few precautions you should take to ensure the security of your device:
– **Only enable USB debugging when necessary:** Disable USB debugging when you’re not using it to prevent unauthorized access to your device.
– **Only connect to trusted computers:** Only connect your Android device to computers that you trust to prevent malware from being installed on your device.
– **Use a strong password:** Set a strong password on your Android device to prevent unauthorized access in case your device falls into the wrong hands.
Conclusion
Thanks for visits imagerocket.net for taking the time to learn about the importance of USB debugging and how to enable it on your Android device. By unlocking this powerful tool, you can take your device to the next level, whether you’re a developer, a tech enthusiast, or just someone who wants to get the most out of their phone or tablet.
Remember, USB debugging can be a double-edged sword, so use it wisely and only when necessary. Always be careful when granting USB debugging access to third-party apps, and never give out your device to someone you don’t trust.
With that said, we hope you found this guide helpful and informative. If you have any questions or feedback, please don’t hesitate to reach out to us. We’re always happy to hear from our readers and help in any way we can.
So go ahead and enable USB debugging on your Android device today, and unleash its true potential!


